
One of my OKM’s favorite characteristics is the full separation of gas and electrical functions. I cooked and baked for over a year without the stove being plugged in.
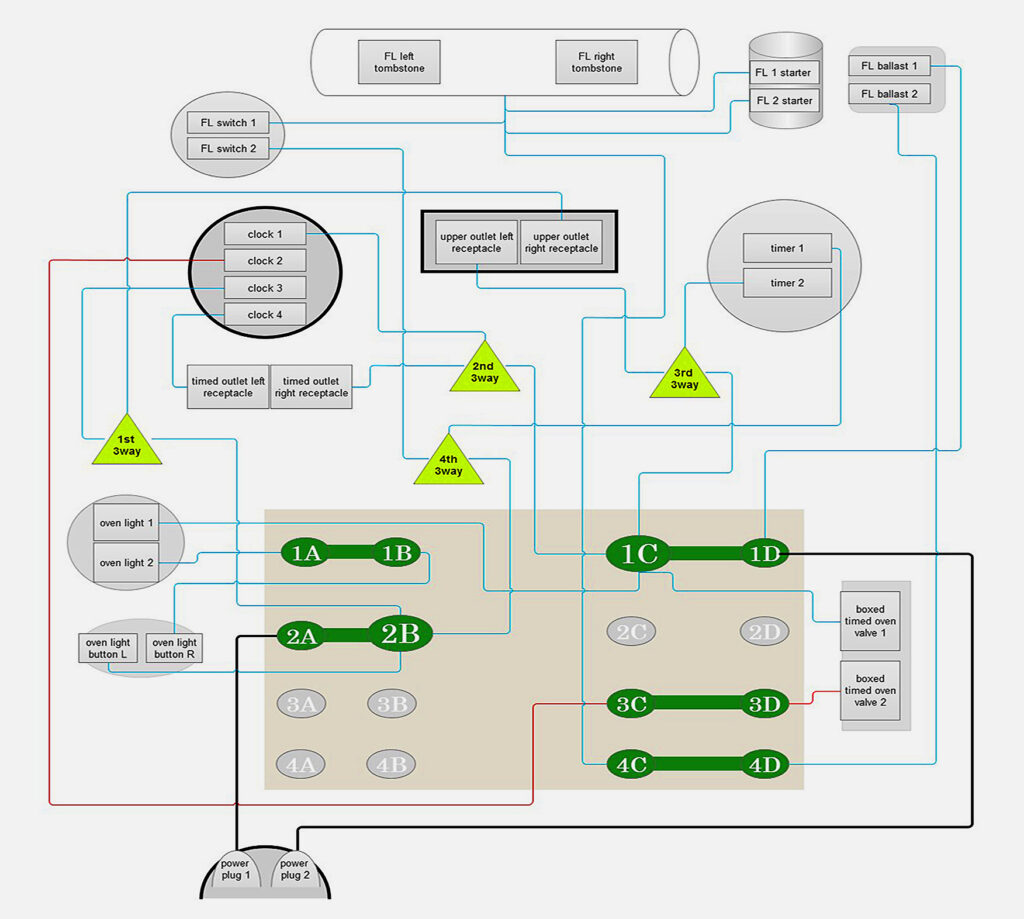
My stove’s electrical system was configured to power and control:
- clock
- timer
- fluorescent light, switch, ballast, starter
- oven light
- timed oven gas flow switch (solenoid)
- timed electric outlet
- standard electric outlet
When I first got the stove I plugged it in to see what worked. The fluorescent light turned on and the timer buzzed – an indication that at least some things worked. The oven light didn’t turn on when the door was open. The other items were functional unknowns. So I unplugged it, figuring to wait until I felt like tackling that huge unknown facet of the stove.

Electricity was nice but not essential. Plus I didn’t feel confident the electrical system was totally safe. It was obvious it hadn’t been touched or updated in decades. In car parlance, it had skipped half a dozen oil changes.
During the initial restoration phase I focused on general cleaning and managing the gas side of things; detecting and fixing gas leaks, surface cleaning, restoring gas-related items like valves, burners, pilots, thermostats, thermocouples, etc. That took about six months, then I decided to take a restoration break.
Let the Electrons Flow
Many months later…the time hath arrived! Time to see what all this electric wire action was about and how to properly update it. Obviously, I could have hired an electrician, but that would not have been my version of DIY fun. Again, one of the best things about these vintage stoves was accessibility to most functional components. No motherboards, mysterious microscopic elements or critical software updates. Nearly all electrical connections were easy to see and trace, at least after the layers of prehistoric debris was removed.
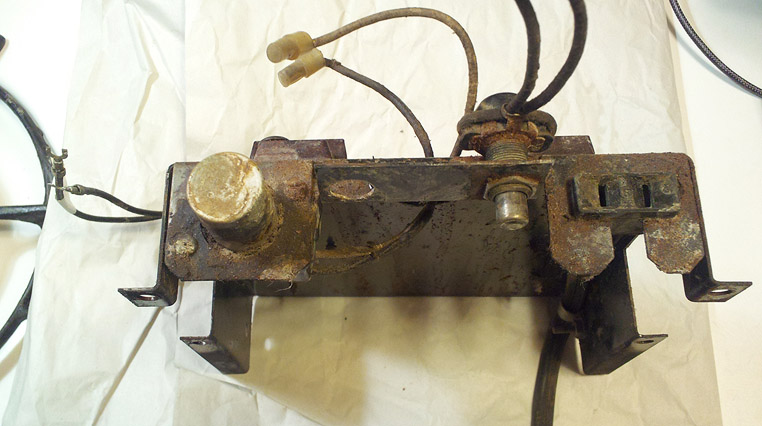
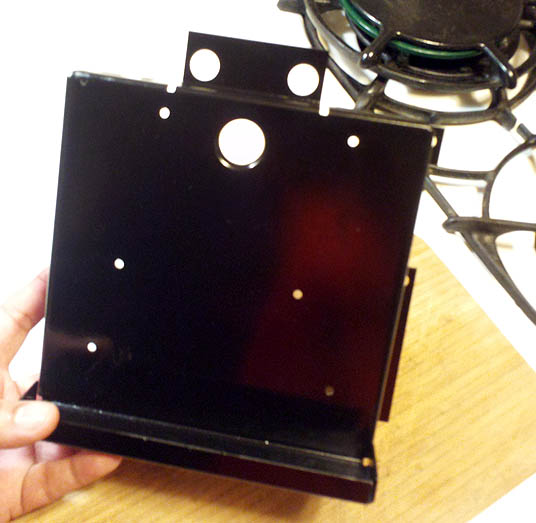
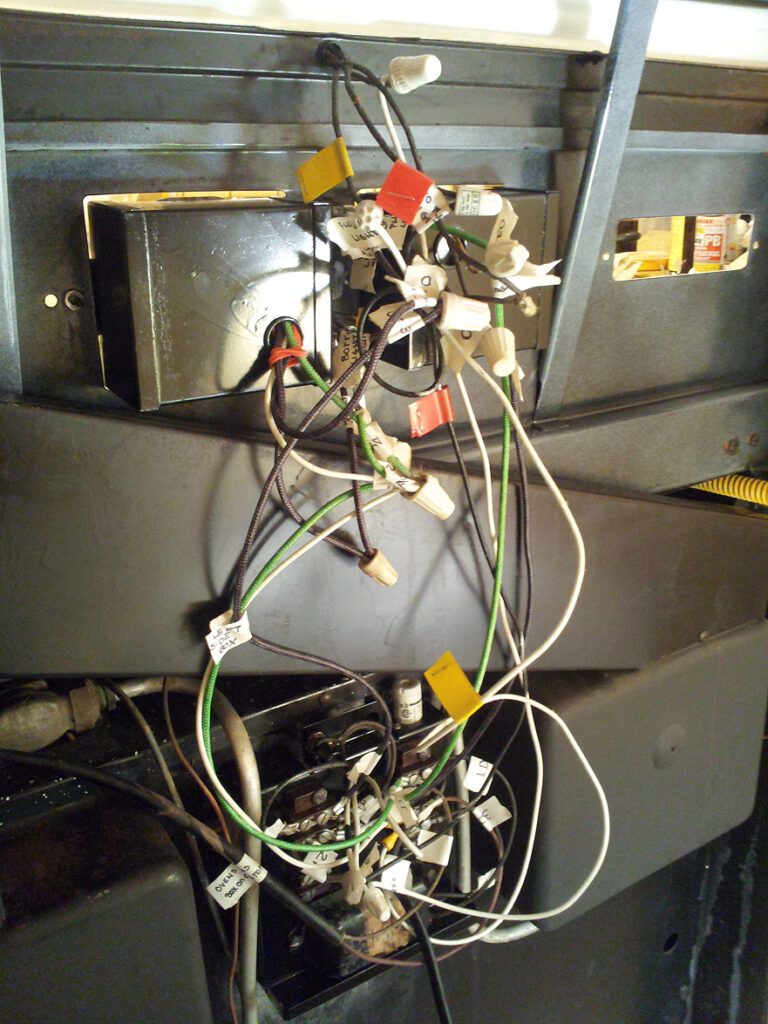
The section on the back of the stove that supported the key electrical connections and the thing that looked liked something attacked by an ice storm was the stove’s power distribution panel. Likely it had been untouched since the day it was assembled. It was coated with what looked like icicles of dust and dirt.

Removing the dripping dust helped me very little towards understanding what was connected to what. I wasn’t an electrician, but I figured after 60 plus years, it was time to perform a little update in wiring, connectors and such.

With no understanding about the electrical “weave” of wires and why electrical components were linked the way they were, the best I could do was to replicate every pathway with new wires, terminals, etc. wherever possible.
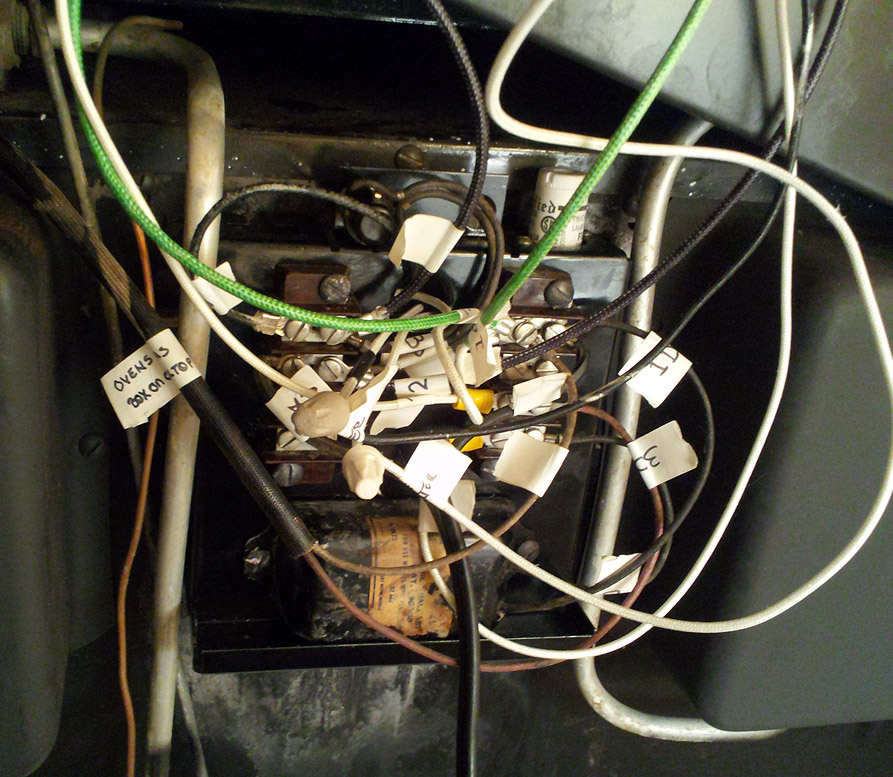
Replicating meant tagging every wire, what it was connected to and the color of the wire, then replacing with new wires and connectors, following the exact same pathways. Masking tape and a marker was all that I used.
To prepare for this DIY phase, I had to learn some new terms, like:
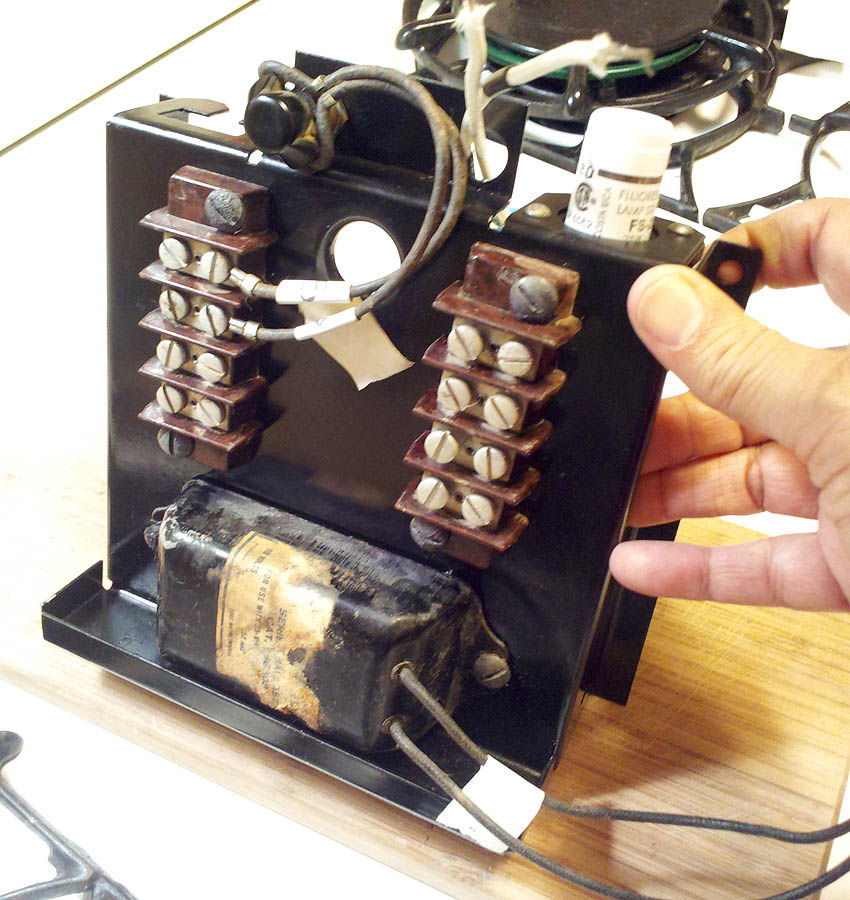
- 4 gang terminal blocks
- fluorescent light 25W starter, starter base and 0.52 amp ballast
- fork and ring terminal ends
- high temp wire nuts
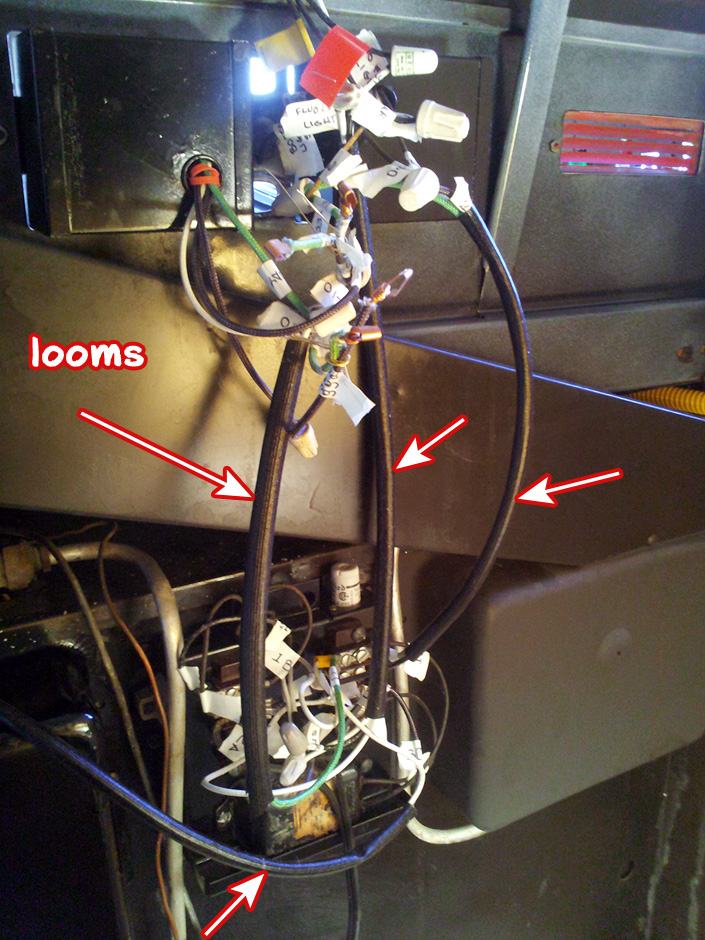
- fiberglass looms
- insulated high temperature single stranded wire
- LED retrofit kit *
- etc…
The hardest things to find were the high temp wire and high temp (ceramic) wire connectors. Given the entire panel was hanging just an inch or so off the back of the oven and broiler chambers, I wanted the wires to have exceptional protection; nothing a standard hardware store could fulfill. It turns out, the local hardware stores and nearly all electrical supply businesses couldn’t fulfill those needs. Not quite sure why. Fortunately, I lived near very specialized great brick and mortar resources:
- HSC Electronics (3500 Ryder Street, Santa Clara, CA); now excesssolutions
- an awesome Appliance Parts Company (1062 The Alameda, San Jose, CA)
- a fabulous lighting restoration business – Phoenix Antique Lighting & Building H/W (1887 W. San Carlos AveSan Jose, CA)
Thanks to APC and HSC, I acquired plenty of high temp wire in white (16ga), black (12ga) and green (12ga). The stove also used a small amount of red wire. Someone’s suggestion to simply color a segment of white wire with red paint or tape was a great workaround to locating red high temp wire.

I wanted porcelain wire connectors to go with the high temp wire. Unlike plastic wire nuts, porcelain ones are truly high temperature tolerant. However, nearly all local businesses that carried electrical supplies not only did not carry them, they weren’t quite sure what they were. Thankfully, it was possible for me to order them online. But I wondered – was there was a local supply, other than my own 1938 house’s knob and tube electrical system? Maybe antique stores carried some since porcelain connectors were used before plastic ones came out. Luck fell my way when I discovered the Phoenix Antique lighting shop in San Jose; the only local antique dealer who actually collected them!

WRT the panel’s two terminal blocks, I identified each screw by the same row/column system as Excel. Rows were 1-4, columns A-D. Before removing a wire, I’d tag each end with tape. The end that connected to a terminal block might be 1D or 3A, depending on which screw it was connected to.
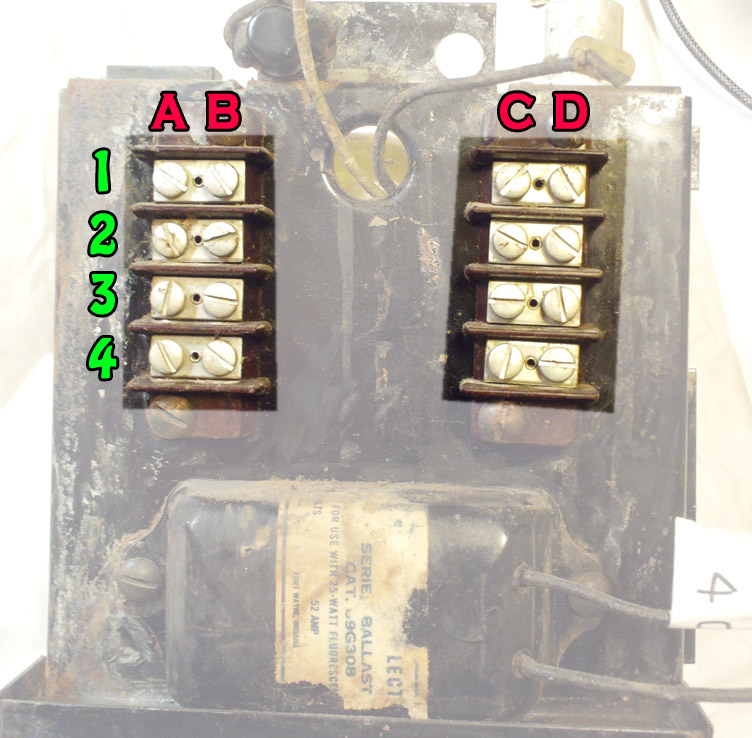
With every electrical connection tagged, checked, double checked and photographed, it was time to disconnect everything from the panel. This step terrified me. If I made a tagging mistake, it’d likely be a very, very long time before I had the patience to fix the mess or the money to hire an electrician.

Once all the wires were unconnected from the panel, I removed the other parts; starter base, oven door switch, ballast and terminal blocks. Even the poor rusty panel got a beauty treatment (derusted and repainted). For all painting tasks I used either high temperature products; paints made for coloring engines or outdoor grills and barbecues.


While the actual copper was in fine shape, the wire insulation and wire connectors were brittle. It was obvious rewiring was desperately needed. One by one I replaced the old wire with the new, making sure to replicate the tags. It was no time for creativity. I decided I’d replace about 80% of the wiring. The fluorescent wiring would remain mostly untouched since I had plans to replace the entire fluorescent cable harness with an LED system that wouldn’t need a ballast or starter.
Slowly, one by one I replaced each old wire segment and fork terminal; each old wire connector with a new one. With my breath held, I plugged in the stove. I tried the cooktop light, listening for the clock to hum, toyed with the timer. Nothing.
It was hard to tell where the problem was. I needed someway to test continuity, voltage, etc. This was where I needed someone with electrical skills and tools. Good thing my brother was an amateur electrician. With his multimeter and knowledge, he determined the wiring was good; just a couple of tweaks were needed. Tightening a couple of terminal block screws, reseating the fluorescent tube, etc. and ta da!
A week or so later the fiberglass looms (wire sleeves) arrived. These were sleeves to run 3-4 wires through. The sleeves provided extra protection. They were part of the original installation, so I added those looms to the wiring harness.
Even the things that didn’t work right after I bought the stove now worked. The oven light lit, the clock worked, the outlets worked. More than a year’s worth of dread and procrastination was over. Hot Damn!


There were still a few tweaks and repairs to be done, but the preliminary power test was a success! I was full of nerdly vintage stove joy!
* I would have tried to find a new ballast for the fluorescent light, but the one on my already worked. Any future lighting upgrade plans involve switching to LED, which would eliminate the need for a ballast and a starter. I need to find a suitable ‘LED fluorescent retrofit’ 3ft linear tube.
Note: Mentioned several times on this page is the fact that I’m no electrician. Still don’t know the difference between a watt, volt, ohm, etc. However, I attempted to map all the connections between all the electrical terminals on my stove. Enjoy.